
If you follow me on Pinterest you know that I have a slight obsession with Horizon Stripes….not wearing them so much, BUT rather horizon stripes in home design. There’s just something about them that looks so current and yet classic at the same time. They can inject a little personality into your space and make it look very well thought out.
Well, I’ve been itching to do a home update for a while, but am trying to save my house budget for a bigger project down the road. So what’s a girl to do? Rummage though the gallons of paint in her basement of course!
Long story short, a little rummaging, a little pinteresting, a little YouTubing, and I was settled. Horizontal Stripes belonged in my Entry Way! And at present, I kind of have a crush on my Entry Way. So, if you are longing to fall in love with your space again…walk with me, talk with me…
First things first, you want to measure your wall height from the base of the crown molding (if you’re so lucky to have it) to the top of your base board. Then divide that number by the width you’d like your stripes to be. Standard Stripes are between 11’’-13’’. I made mine just over 11 inches to get an even number of stripes.
Now comes the measuring and taping. Definitely the most tedious part of the process, so I recruited the cute guy that lives in my house for a little help 😉 Chris held the laser level (good guesses Instagram & Facebook Friends!)

while I drew the lines with a pencil.
If you don’t have a laser level, you can still tackle this project with a standard level, it’ll just take a little longer.
Once you are done with your penciling you’re ready to tape. For this project I used Frog Tape. Which was $6 at Target and the only out of pocket expense for this little project. It was my first time using it, and let me tell you, I am a fan for life! I’ll tell you why in a minute, but for now here’s a tip to learn from my mistakes:
YOU DON’T WANT TO TAPE OVER YOUR PENCIL MARKS!
This seems extremely obvious, however, that concept was lost on me that Saturday afternoon and I taped right over top of them. No worries, I Magic Erasered those lines into extinction after the tape came off 😉 Anyways…just make sure you’re either taping right above or right below the line (depending on if it’s the one you’re painting OR if it’s the one you’re leaving the existing color.)
See Exhibit A of Chris doing it the RIGHT way 🙂

OK, next and probably the most important: take a credit card and smooth down your tape! This will prevent any bleed through as well as what we, in the biz, call “warbly” lines. It’s a real thing. Look it up.
Alright, you’re all taped and ready to paint, which ironically is the fastest part of this process.


The original color on the wall is called “Thunder Bay” by Ralph Lauren, which sadly they DO NOT sell at Home Depot anymore. 🙁 The accent stripe is actually my leftover trim paint called “Edwardian Linen” also by Ralph Lauren. And because it was originally trim paint it’s a semi-gloss, which ended up being a fun contrast to the Satin base of the Thunder Bay.

Our stripes went on nicely with two coats and then all there was to do was wait for the inevitable…How much touch up paint will we have to do once the tape comes off?
(Cue dramatic Law and Order music)
Weeeeelll, remember the Frog Tape I’m loving? There’s a reason for that. Upon taking off said Frog Tape and holding my breath…NO Bleed Through! At all, not even one little line! I know! I may or may not have burst into song at this point. The world will never know. So, here you go kids, the finished product.
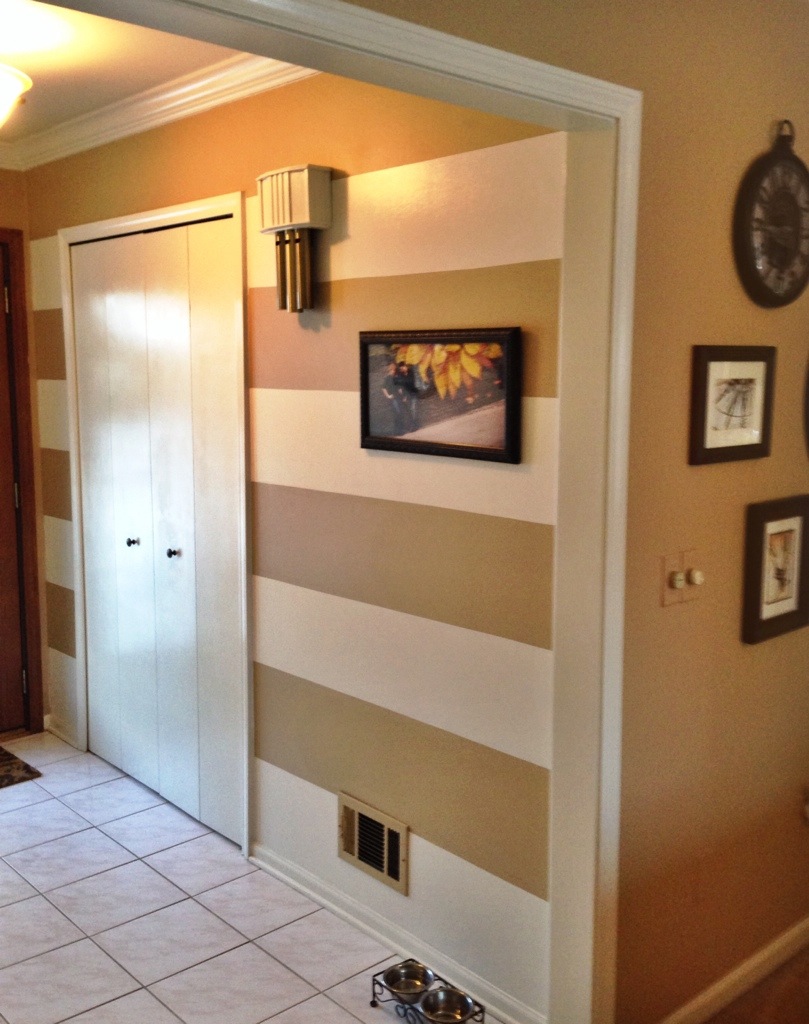
(A little “hello” from my Copy-cat Pottery Barn Clock Wall)
And you know what, I love it even more than I thought I would!
To finish the space off, I added last years outdoor pillows & my FREE DIY side table from this post:


It’s the finishing touches that really bring a space together, you know? 🙂
Ok guys final tip. Whenever you’re painting with light colors, always wear black socks. A. you’ll keep a sense of humor about you if you’re painting in shorts and B. you can see if you’ve stepped in any paint before you go tracking it all over your house. Hope you’re feeling inspired, Happy D.I.Y.ing!
Until Next Time,
Meg
*This post contains affiliate links, but all opinions are 110% ours 🙂


It looks so cute! I love it!!!
Thanks Sarah!!
I love that you have nothing to disclose as well as this post! Great idea and I love that it is so inexpensive. I feel like you could do this with two different paint colors that are just slightly different in shades from one another and still create a new look without, oh I don’t know, breaking to many of the rules your landlord has about painting your apartment.
Thanks Leah! And yes, that would be a beautiful way to bend the rules! I’ve also heard of “wallpapering” with fabric and spray starch! It’s supposed to work great for renters because there’s no damage 🙂
Love love love it!! Very sharp Megan and nice to know the frog tape works.
Thanks Kathy!! Works like a charm 🙂
Love the stripes! I have yet to try frog tape but I think I will now!
Thanks so much! Yes, I think you’ll be really happy with it!
You are an inspiration, Megan… I love the look! I also just learned there is a free app that turns your phone into a level for folks like me with tool deficiencies!
Thank you Sarah! A level app?!? OOO I can’t wait to try
Dani’s bedroom is in need of a major overhaul. We were going to paint it but now thinking about doing these stripes maybe in two colors. You know Dani, a very colorful young lady. Sooo, I may be calling on your thoughts and opinions.
That would be really fun, Dani without a doubt, needs something as uniquely beautiful and fun as she is 🙂
I am also loving horizontal stripes right now! I really want to get some horizontal stripe curtains for my bedroom. Why are they so expensive though???
Oh I know! I love them too! I actually just pinned a no-sew horizontal striped curtain “hack” 🙂 Maybe it’ll be a solution for you? http://www.pinterest.com/pin/258886678554775233/
Amazing what a little work and only $6.00 will do! Your home looks so welcoming and this little entry way makeover makes it even more so!
Thank you so much Carrie! 🙂 Best $6 I ever spent 😉
Your entryway is stunning!! Excited to follow along!
Thank you so much Selene! So glad you stopped by 🙂
Love the entry way with the stripes!
Thank you so much for checking it out! 🙂
It looks amazing! Pinned and tweeted. Lou Lou Girls
Thanks so much for the social media love! ?
Love the stripes, that next on my wall to-do list!
Thanks Michelle! Let me know how it turns out!!
Wow this is an amazing life hack. I would skip my subway sandwich for the day to do that to my entry way! It turned out so well!
Thank you! I know, it’s amazing how far you can stretch 6 bucks!
Love the stripes and your mirrors! Thanks for frog tape tip.
Thank u so much! It’s great stuff!
What a nice looking entryway!
Thank you Eliza! So glad you stopped by 🙂
Oh my gosh I love this!! So so so classy! And I LOVE that it’s cheap!
You are so sweet Sarah! Thanks friend:) I know, you can’t beat $6!
I love this! I would love to do something like this, though we don’t have a formal entry way I still think I could make it work!
-Melanie-
http://www.theseblankwalls.com
I think you could make it work too! 🙂 thanks so much Melanie, good luck in your entry way 🙂
This is so cute! Love the horizon stripes!
Thanks so much Christina!!
Love! – in the process of redoing a house on a very little budget.. can’t wait to get your tips!
Thanks Tressa! It is totally do-able! 🙂 good luck in your space, happy to help if I can 🙂
I love how just a little paint and time can transform something to look so sleek! 🙂
Paint is such a game changer! Thanks for stopping by Katy! 🙂
Oooooh, it’s gorgeous! I love the taupe and white colors too, goes great with your living room. What a fun idea for the entry way (or anywhere, for that matter)! Thanks for linking up to “Making Your Home Sing Monday” linky party!
Thank you so much Nan! Always look forward to your linky party! 🙂
It looks like the best $6 ever spent!
I was pretty pumped about it! Thanks so much Heidi! 🙂
Wow, what a bold and beautiful entry! Great idea. 🙂
This looks awesome! I am so impressed by your smooth lines. We added stripes to my son’s wall and they came out…warbly I assume. LOL Not smooth. We used Frog Tape and I smoothed the tape down with my hand really hard. I’m wondering if the credit card is the trick? I’m tempted to try and fix his stripes…
That’s a bummer! Straight lines are hard! Lol I’m sure it looks better than you think ?
I love what a dramatic change paint can make for such little expense- looks great! Thanks for linking up on Tuesday!
Kim
http://peeledwellness.com
Paint is a game changer! Thanks so much Kim!!
Very Cute!! Good Job! Thanks for Sharing on My 2 Favorite Things on Thursday – Link Party!! Hope to see you again tomorrow!! Pinned!!
Thanks Elaine!
Your entryway is so warm and inviting – I love it and I’m slightly jealous 😉
Thank you for linking up with us at the Wake Up Wednesday Linky Party!
Haha, thanks Becca! So glad you stopped by 🙂
Wow! This looks great! I wish I had the guts to create stripes on a wall in my house, I am just too afraid I will mess it up big time. Thanks for sharing with us at Motivational Monday!
Go for it Melanie! You can totally do it! Worse case scenario, just re-paint 😀 so glad a “fellow mitten” friend stopped by 🙂
Reblogged this on .
Wow! That turned out great!
Darlene
http://whosaprettygirl.com
Thanks so much Darlene!
I love the entrance hallway. I just saw this the other day on hgtv. Girlfriend u have great decorating ideas always. ?
Sue, you’re awesome! Always so encouraging 🙂 thank u!
We just moved into our home a few months and we’re still unpacking :/ But, I love the idea of adding stripes to change up the entryway! Just started following you on pinterest, too!
Thanks Rebecca!! 🙂 Congratulations on the new home! it takes a while to get settled for sure!
Amazing!! So beautiful and creative…. and I LOVE frog tape….worth every extra penny. Don’t rip it with your teeth though….the paint repelling chemicals are super bitter:( (ew…and probably very toxic)
Thanks so much! And good tip 🙂
Hi, Megan ~ This looks great! I love horizontal stripes, too, but I haven’t conquered my fear of the measuring part of the project. You’ve helped me with that (of course, it helps that I’ll be “recruiting” Hubs for that part)! Now, where to put stripes all over, uh, I mean IN my house. :0) Thanks for sharing! Off to grab Frog Tape…
Thanks Tiffany! The measuring/taping was the most tedious part, but you can TOTALLY do it! If you end up finding a good spot for the stripes, you’ll have to let me know how it turns out!
I love the striped walls and the mirrors. So pretty!
Thank you for linking up to the Wake Up Wednesday link party!
We hope to see you next week!
Kate | TheOrganizedDream.com
Thanks SO much Kate!! 🙂
Love the look of the stripes! And no bleeding through the tape- that’s awesome!! Thanks for linking up with us at Motivational Monday. Hope you will join us again tomorrow night!
Thanks Becky! That tape is awesome! 🙂
I like how it blends, between the wall color in the other room and the white tile. Thanks for posting. Hello from Handmade Hangout.
Thanks Melissa! 🙂 I’m happy with the end result, especially for $6;)
Great tip about the credit card to smooth out the tape! How many times have I had little paint bubbles that screw up my lines!!! I’ve been thinking about horizontal stripes in my living room, but I want tone on tone with different finishes. We have Gray Ghost in our living room in eggshell and I was going to paint Gray Ghost stripes in semi-gloss. I’m not sure I’ll be able to get my hubby on board though! Your stripes look awesome and make the whole area look finished! Stopping by from Two Uses Tuesday. Hope you have a great week!
Why Thank you so much! I love the idea of stripes in 2 different finishes 🙂
Best $6 ever spent!
Thanks Heidi! I know 6 buck? Can u believe it 🙂
I love the stripes – I had stripes in my living room in my Indiana house and I really liked them. In fact they were just about the same color. Great update on the cheap. Visiting Lou Lou Girls.
Did you really Rebecca? Good to know I’m not alone in my love of stripes! 🙂 Thanks for stopping by, glad to have found your blog, just pinned some content 🙂